How To Do A Mail Merge In Outlook: Complete Guide

“Can I do a mail merge in Outlook?” is one of the most frequently asked questions by Outlook users. And despite being a bit tricky, a mail merge Outlook procedure can be taken care of easily with the help of self-help guides such as we have got you right here.
So What Does Mail Merge in Outlook Actually Mean?
A mail merge in Outlook means sending a personalized message to multiple contacts at once via an Outlook email client. This is a great way for sending newsletters or festival greetings since it looks more personal and helps build rapport with clients and customers as well.
How to Set Up Mail Merge in Outlook?
There are numerous ways to do mail merge in Outlook 365. Tools such as ‘easy mail merge Outlook add-in’ and plug-ins help simplify the whole process. This guide brings to you all that you should know to merge emails in Outlook and other essentials. Let’s check them all out right here:
Mail Merge in Outlook 365
Initiating a mail merge via Outlook 365 is the easiest method if all the contacts are already in your Outlook contact folder. In this guide, we will teach you first how to send an email to the selected contacts. Here we go:
- Select the contacts from your Outlook’s ‘contact folder’. (You can use shortcut CTRL + 3 to quickly access your contact folder.)
- Click to select the contact that you want to dispatch your draft to. You can also apply a filter to have a personalized view.
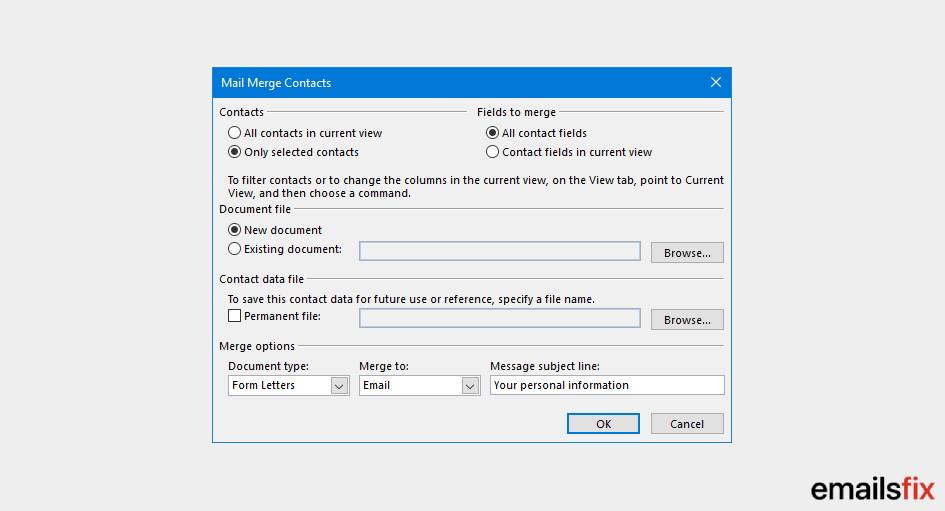
- Click on Tools and select Mail Merge from the drop-down menu.
- Click to verify from one of the following options:
- ‘’All Contacts in Current View’’ that helps filter the contacts that you want to address become visible.
- ‘’Only Selected Contacts’’ is required when you manually select the contacts from the contacts folder.
- At the bottom of the dialog box, under the ‘Merge Option section, choose the following:
- Document Type: Form Letters
- Merge To: Email
- Message Subject Line: <draft your subject here for all the message> (you can modify as per your requirement)

- Hit the OK and wait for the email draft box to appear.
- Go to the Mailing tab.
- Draft an email by using the following options:
- Click on the ‘Greeting Line’ button to insert greeting/pleasantries in your email.
(Please note that you can freely type in the field box. So instead of selecting “Dear ” you can also type “Hi or Gud Morning“)
- Once you are satisfied with your greeting line, click OK.
- As an example, we have to verify the email addresses by the contact. For that we have to type the following :
- “Please verify your contact details that we have on file and either confirm it to us or provide us updated information.”
- Press ENTER again to start a new line and insert the address by pressing the “Address Block” button.
- Click OK to close the dialog box and hit Enter to start a new line.
- We can also insert the telephone number or any other details by clicking on the “Insert Merge Field” button.
- Select ‘Home Phone’ or ‘Mobile’ option and then hit the Insert button.
- Click on the Close button, and then press Enter to start a new line.
- You can close your message by typing the following: ‘Thanks in advance or Best Regards <Your name>.
- Now you can preview your results to ensure that everyone’s name is coming up correctly. It’s now time to flick the “Preview Results” button that you will spot in the “Preview Results” group. Use the forward and back arrows beside it to run through your recipient list.
- Hit the ‘Finish & Merge’ button followed by the ‘Send email messages’ button.
How To Create A Mail Merge From Microsoft Word To Outlook?
To mail merge in Outlook using Microsoft Word is easy.
Please note that Microsoft Word is compatible with mail merge using Outlook 2007 or higher versions.
Here are the following steps to create an email merge using Microsoft Word.
- Launch Microsoft Word 2010. Compose an email in a Word file.
- Hit the Mailing tab.
- Click on the “Start Mail Merge” button. It will show a list of mail merge options available. You can choose Letters, Email Messages, Envelopes, Labels, or Directory.
- Click on the ‘Select Recipients’ button that helps you select the recipients of your email merge.
- Click on ‘Select from Outlook Contacts’. It will automatically integrate your contact from Outlook 2010 contacts.
- Click on the ‘Greeting Line’ button to insert greeting/pleasantries in your email. Once you are satisfied with your greeting line, click OK.
- Click on “Write & Insert Fields” where you can find the appropriate fields to add any other piece of data. Click on the OK button to proceed.
- Now you can preview your results to ensure that everyone’s name is coming up correctly. Hit the “Preview Results” button one more time in the “Preview Results” group.
- Flick the ‘Finish & Merge’ button followed by the ‘Send email messages’ button
- You would ask to add a subject to your draft. Once done, click on OK to send the message.
- Microsoft Word automatically sends the newly composed email to your Outlook’s outbox.
- Users can view their Outlook mail merge with attachment in the sent items folder
How to Perform Outlook Mail Merge in Microsoft Excel?
To send an email to a large number of recipients you can use Outlook mail merge feature with Excel and Word together. It helps customize messages for each recipient.
With the help of an Excel sheet, users store all of the recipient's information. The purpose of creating a spreadsheet is to perform Outlook mail merge with attachment.
Create a spreadsheet that contains column headings such as First Name, Last Name, and the Email Address. Once done, follow the steps below to initiate mail merge in Outlook :
- Launch Microsoft Word and begin with a blank document.
- Go to the Mailing Tab.
- From here on go to the Start Mail Merge menu.
- Select the E-Mail Messages option.
- Choose the Use Existing List option from the Select Recipients menu.
(Please note that we are performing a mail merge from excel to Outlook. We only use an excel attachment. Thus the end result is similar to what we achieved in Outlook.)
- Browse and select the Excel file you created, then click on the Open button.
- In the Select Table window, click on the particular cell that contains the recipient’s information. It will help you customize the contents from your excel spreadsheet.
- Position the cursor where you want to insert the data and then click on the OK button.
- Draft an email now in the Word file.
- Click on the ‘Greeting Line’ button to insert greeting/pleasantries in your email. Once you are satisfied with your greeting line, click OK.
- Click on “Write & Insert Fields” where you can find the appropriate fields to add any other piece of data. Click on the OK button to proceed.
- Now you can preview your results to ensure that everyone’s name is coming up correctly. You will spot the “Preview Results” group. Hit the “Preview Results” button here.
- Click on the ‘Finish & Merge’ button and then hit the ‘Send E-mail messages’ button.
- Go to the ‘To’ drop-down menu and select the whole field.
- You would ask to add a subject to your draft.
- Click on the Mail-Format drop-down menu, and select the HTML option.
- Click on All button next to Send records radio button.
- Once done, click on OK to send the message.
Conclusion
If facing any kind of difficulty performing a mail merge in Outlook, you can feel free to reach our customer support anytime. Keep reading for complete guides on how to add a read receipt in Outlook and other topics.
 Fix Sending Reported Error 0x8004010f In Outlook 2010 & 2016
 How to Solve Outlook error 0x8004011d?
 Outlook Reply With Attachment