Secureserver.Net Email Settings

The Secureserver.Net email provides its users with a facility to configure their Secureserver.Net email account on any device or email account. For this purpose, you need to know the correct Secureserver.Net Settings as the email account cannot be configured without the correct server settings. Don’t worry, we have mentioned below the Secureserver.Net Settings in detail for various devices and email clients that you need to apply. You will find here the IMAP, POP and the SMTP server settings of the Secureserver.Net as well. After going through this article, you will come to know the procedure to configure your Secureserver.Net email account as per the correct server settings.
Many other articles regarding the Secureserver.Net email settings just beat around the bush and you do not get a clear picture of what settings to apply for your email account configuration. Well, we won’t do this. Let’s start straight with the general server settings of the Secureserver.Net.
Secureserver.Net IMAP Settings (Incoming Mail Server)
The IMAP server settings are required for the activation of incoming email services. We have mentioned below the correct Secureserver.Net IMAP Sett ings that you need to input and apply during the configuration process of your Secureserver.Net email account.
| Secureserver.Net Incoming Email Server account type | IMAP |
| Secureserver.Net Incoming Email Server user name | Your full Secureserver.Net email address |
| Secureserver.Net Incoming Email Server password | Your Secureserver.Net email password |
| Secureserver.Net Incoming Email Server hostname | imap.secureserver.net |
| Secureserver.Net Incoming Email Server Port | 993 |
| Secureserver.Net Incoming Email Server TLS/SSL required | YES |
| Authentication required | YES (Email account Username and Password) |
When you are done with the application of the aforementioned IMAP server settings for your Secureserver.Net email account, you will be able to receive emails without any problem.
Secureserver.Net POP Settings (Incoming Mail Server)
When you start to configure your Secureserver.Net email account, you can choose to go with the IMAP server settings or the POP server settings. Any of these server servers can be used for incoming mail services. So, if you want to go with the POP server settings as per your requirements, then the below-mentioned table will help you to know and apply all the required Secureserver.Net POP settings.
| Secureserver.Net Incoming Email Server account type | POP |
| Secureserver.Net Incoming Email Server user name | Your full Secureserver.Net email address |
| Secureserver.Net Incoming Email Server password | Your Secureserver.Net email password |
| Secureserver.Net Incoming Email Server hostname | pop.secureserver.net |
| Secureserver.Net Incoming Email Server Port | 995 |
| Secureserver.Net Incoming Email Server TLS/SSL required | YES |
| Authentication required | YES (Email account Username and Password) |
As soon as you apply the aforementioned POP server settings, your Secureserver.Net email account will be set up as a POP account and your mail inbox will start showing incoming emails.
Secureserver.Net SMTP Settings (Outgoing Mail Server)
You must also input and apply the Secureserver.Net SMTP Settings as given below in the table to activate the outgoing mail services. Without the correct SMTP server settings, no emails can be sent.
| Secureserver.Net outgoing Email Server account type | SMTP |
| Secureserver.Net outgoing Email Server user name | Your full Secureserver.Net email address |
| Secureserver.Net outgoing Email Server password | Your Secureserver.Net email password |
| Secureserver.Net outgoing Email Server hostname | smtpout.secureserver.net |
| Secureserver.Net outgoing Email Server Port | 465 |
| Secureserver.Net outgoing Email Server TLS/SSL required | YES |
| Authentication required | YES (Email account Username and Password) |
The aforementioned Secureserver.Net SMTP settings will help you in the activation of outgoing mail services for your Secureserver.Net email account. Now, send an email to someone and see if the emails are being sent successfully or not.
Secureserver.Net Settings for Android
Many of you may be wanting to set up your Secureserver.Net email account on your android devices. No problem, we have got the correct Secureserver.Net settings for android that is mentioned below in detail along with the other necessary steps to configure your Secureserver.Net email account on android devices.
Step 1- Firstly, go to your android device’s app drawer menu and then make a click on the Mail icon.
Step 2- Now, you are required to input all the required information such as your complete email address and password in the respective fields.

Step 3- click on the option of “Manual Setup”.
Step 4- You can go with the IMAP or POP server for the incoming mail server as per your preference and requirements.

Step 5- Now, if you have selected the IMAP server for the incoming mails then you need to input and apply the IMAP server settings as mentioned below.
| IMAP server | “imap.secureserver.net” |
| Security type | None |
| IMAP server port | 993 |
| Secure port | 993 |
| Security type | SSL/TLS (Accept all certificates) |
| Insecure port | 143 |
| Security type | None (Accept all certificates) |
Users can always go with the POP server instead of the IMAP server and enter the POP server settings as mentioned below.
| POP server | “pop.secureserver.net” |
| Security type | NONE |
| POP server port | 995 |
| Secure port | 993 |
| Security type | SSL/TLS (Accept all certificates) |
| Insecure port | 110 |
| Security type | None (Accept all certificates) |
Step 6- After you finish entering the server settings as mentioned above as per your selection of IMAP or POP server, click on the “Next” button.
Step 7- Now you also need to input and apply the outgoing SMTP server settings as given below and then make a click on the “Next” button.
- Input “smtpout.secureserver.net” in the place of the SMTP server.
- You must set the security type as None.
- You must set the SMTP server port to 465. Below are the general SMTP server settings.
| Outgoing (SMTP) secure port | 465 |
| Security type | TLS/SSL (Accept all certificates) |
| Outgoing secure (SMTP roaming server) port | 587 |
| Security type | TLS/SSL (Accept all certificates) |
| Outgoing (SMTP) port | 25 |
| Security type | None (Accept all certificates) |
| Outgoing insecure (SMTP roaming server) port | 587 |
| Security type | None (Accept all certificates) |
Step 8- In the end, You need to click on the “Done” button to complete the account configuration process.
All the aforementioned steps and procedures will help you to configure your Secureserver.Net email account successfully on any android device. You can now send/receive emails through your android device without any issue.
Secureserver.Net Email Settings for iPhone
Some users find it difficult to configure their Secureserver.Net email account on their iPhone device as they do not know the server settings to be applied. No worries, below mentioned are the correct Secureserver.Net email settings for iPhone explained in a stepwise manner through which you will be able to set up your Secureserver.Net email account successfully on any iPhone.
Step 1- Firstly, you must go to the settings of your iPhone.
Step 2- Now, click on the “Mail” option.
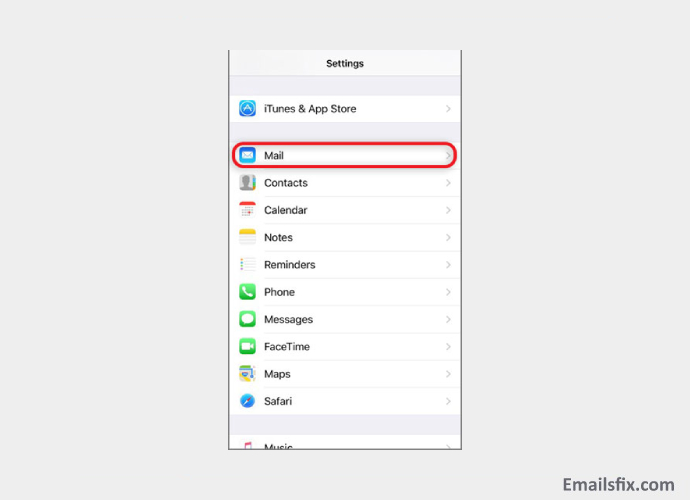
Step 3- Click on “Accounts”.

Step 4- Select the “Add Account” option.
Step 5- Now, select the option of “Other” from the available menu.
Step 6- Make a click on the option of “Add Mail Account”.
- Input your complete email address in the place of Username. The username and password will remain the same for both the incoming and outgoing mail servers as well.
- Enter “pop.secureserver.net” in the place of incoming mail server hostname.
- Enter “smtpout.secureserver.net” in the place of outgoing mail server hostname.

You can always choose to go with the IMAP server instead of the POP server and simply input the server settings as mentioned below:
- Make sure that your complete Secureserver.Net email address is entered in the place of the username. The username and password will remain the same for both the outgoing and incoming mail servers.
- Enter “imap.secureserver.net” in the place of incoming mail server hostname.
- Enter “smtpout.secureserver.net” in the place of the outgoing mail server.
Step 10- You will now encounter a prompt message asking for the verification of the incoming and outgoing server details, you may click on the “Continue” button for both the incoming and outgoing servers or make a click on the “Details” and then click on “Trust”.
Step 11- Now you need to click on the “Save” button to apply the above-mentioned server settings.
Step 12- Make a selection for the account that is created just now by you.
Step 13- Choose the “SMTP Server”.
Sep 14- Make sure that you enter the SMTP server settings as given below and then simply make a click on the “Done” button.
- The outgoing mail server hostname must be set as “smtp.secureserver.net”.
- Your complete email address must be filled in the place of the username.
- Your email account password must be filled in the place of the password.
- You may set the SSL to On or set it to off and then enter the server port settings as given below.
| (SMTP) outgoing secure port | 465 |
| Security type | SSL/TLS (Accept all certificates) |
| (SMTP roaming server) outgoing secure port | 587 |
| Security type | SSL/TLS (Accept all certificates) |
| (SMTP) outgoing port | 25 |
| Security type | None (Accept all certificates) |
| (SMTP roaming server) insecure port | 587 |
| Security type | None (Accept all certificates) |
- Make a selection of the “Password” option for Authentication.
Great! The correct Secureserver.Net email settings for iPhone have been applied and now you are all set to use the Secureserver.Net email services on your iPhone device without any hassle.
Secureserver.Net Email Settings for Outlook 2007
The below-mentioned steps describe the Secureserver.Net email settings for Outlook 2007. You can configure your Secureserver.Net email account on Outlook 2007 within a matter of a few minutes through the help of the below-mentioned steps in sequence.
Step 1- Firstly, you need to launch the Outlook 2007 program on your system.
Step 2- Now click on the option of “Tools” that is available on the menu bar.
Step 3- Select the option of “Accounts Settings”.

Step 4- Find and click on the email tab under the Account Settings page and then click on the “New” option.

Step 5- Select the option of “Microsoft Exchange, POP3, IMAP, or HTTP” and then simply click on the “Next” button.

Step 6- Make a selection for the checkbox reading as “Manually configured server settings or additional server types” and then click on the “Next” button.
Step 7- Choose the option of “Internet email” and then click on the “Next” button.
Step 8- Now you need to fill in all the required details/information in their respective field boxes as per your selection of the IMAP or POP server and then simply click on the option of “More Settings”.
Step 9- Move towards the outgoing server tab and ensure that the checkboxes that read as “My outgoing server (SMTP) requires authentication” and “Use same settings as my incoming mail server” are selected.
Step 10- Click on the Advanced tab and ensure that the server settings are as mentioned below according to your selection of the IMAP or POP server.
Secureserver.Net POP settings
| Incoming port | 110 |
| Outgoing port | 465 |
| Secure port | 995 |
| Security type | SSL/TLS (Accept all certificates) |
| Insecure port | 110 |
| Security type | None (Accept all certificates) |
| “This server requires an encrypted connection (SSL)” | Must not be ticked |
| “Use the following type of encrypted connection (SSL)” | Must be set as None |
Secureserver.Net IMAP settings
| Incoming port | 143 |
| Outgoing port | 465 |
| Secure port | 993 |
| Security type | SSL/TLS (Accept all certificates) |
| Insecure port | 143 |
| Security type | None (Accept all certificates) |
| “This server requires an encrypted connection” | Must not be ticked |
| “Use the following type of encrypted connection” | Must be set as None |
- Make sure to tick the “This service requires a secure connection (SSL)” checkbox for both the incoming and the outgoing mails if you wish to enable the secure SSL/TLS settings.
Secureserver.Net SMTP settings
| Outgoing secure port (SMTP) | 465 |
| Security type | SSL/TLS (Accept all certificates) |
| Outgoing secure port (SMTP roaming server) | 587 |
| Security type | SSL/TLS (Accept all certificates) |
| Outgoing port (SMTP) | 25 |
| Security type | None (Accept all certificates) |
| Outgoing insecure port (SMTP roaming server) port | 587 |
| Security type | None (Accept all certificates) |
Step 11- Click on the “OK” button to save and apply the aforementioned server settings.
Step 12- In the end, just click on the “Next” button and then “Finish” to complete the account setup process.
Congratulations! You have successfully set up your Secureserver.Net email account on Outlook 2007 as per the correct Secureserver.Net email settings for Outlook 2007.
Secureserver.Net Email Settings for Outlook 2010
Want to configure your Secureserver.Net email account on Outlook 2010? Then just follow the below-given steps properly that also mention the required Secureserver.Net email settings for Outlook 2010 and get your Secureserver.net email account configured within a blink of an eye. All the given steps are really simple to follow and execute, you don’t need to put in much time and effort.
Step 1- Firstly, you must launch the Outlook 2010 program on your system.
Step 2- Now, click on the option of “Tools” from the available menu bar and then make a click on the “Accounts Settings” option.
Step 3- Under the “Accounts Settings” page, go to the email section and then click on the option of “New”.
Step 4- Click on the option of “Manual setup or additional server types” located under the Add New Account section and then simply click on the Next button.
Step 5- Choose the “Internet email” option and then click on the Next button.
Step 6- Now you need to input all the required details/information in the appropriate field boxes (choose POP or IMAP as per your requirement/preference) and then make a click on the “More Settings” option.
Step 7- Head towards the “Outgoing Server” section by simply clicking on it and then make sure to tick the checkboxes that read as “My outgoing server (SMTP) requires authentication” and “Use the same settings as my incoming mail server”.
Step 8- Now go to the section of “Advanced tab” and ensure that the Secureserver.Net settings are as mentioned below depending on your choice of POP or the IMAP server:
Secureserver.Net POP Settings
| Incoming port | 110 |
| Outgoing port | 465 |
| Secure-port | 995 |
| Security type | SSL/TLS (Accept all certificates) |
| Insecure-port | 110 |
| Security type | None (Accept all certificates) |
| “This server requires an encrypted connection (SSL)” | Must not be selected |
| “Use the following type of encrypted connection” | Must be set as None |
Secureserver.Net IMAP Settings
| Incoming port | 143 |
| Outgoing port | 465 |
| Secure-port | 993 |
| Security type | SSL/TLS (Accept all certificates) |
| Insecure-port | 143 |
| Security type | None (Accept all certificates) |
| “This server requires an encrypted connection (SSL)” . | Must not be selected |
| “Use the following type of encrypted connection” | Must be set as None (Accept all certificates) |
- Also, you must tick the checkbox reading as “This service requires a secure connection (SSL)” for both incoming and outgoing emails if you choose SSL/TLS settings.
Secureserver.Net SMTP Settings
| (SMTP) outgoing secure-port | 465 |
| Security type | SSL/TLS (Accept all certificates) |
| (SMTP roaming server) outgoing secure-port | 587 |
| Security type | SSL/TLS (Accept all certificates) |
| (SMTP) outgoing port | 25 |
| Security type | None (Accept all certificates) |
| (SMTP roaming server) insecure port | 587 |
| Security type | None (Accept all certificates) |
Step 9- Click on the “OK” button to save and apply the server settings.
Step 10- In the end, click on “Next” and then “Finish” to complete the account setup process.
This is how you can configure your Secureserver.Net email account on Outlook 2010 through simple and easy steps and without any guidance or help.
In this article, we have covered all the required Secureserver.Net settings for different devices and email clients. The server settings given above will help you in the successful configuration of your Secureserver.Net email account. But if you are still having problems/issues in setting up your Secureserver.net email account, then just drop a message describing your problem and we will connect back with you as soon as possible. Our technical team is ready 24*7 to cater to you with solutions to all the email related problems/issues.
Other than the Secureserver.Net settings, we have also provided a detailed guide covering all the Zoominternet.Net email settings and the Zahav.Net.IL email settings that will help you in the configuration of your email account.