Thunderbird Gmail Settings
Confused about Thunderbird email settings? Don’t worry! We will discuss all the settings such as Thunderbird Gmail Settings, Thunderbird Yahoo settings among others right here in detail to help you configure your email account successfully.
You can configure any email account on Thunderbird. You won’t face any problem with the steps and procedures mentioned here as they are really simple to understand and follow. The Thunderbird email settings are defined below in such a manner that you won’t need any technical expertise or helping hand. Go on with the steps and the required settings will be applied.
Before moving ahead with the Thunderbird email settings, let’s know about the Thunderbird software, it is an open-source cross-platform email client developed by the Mozilla Foundation. It was initially launched in 2003. You can conveniently arrange all your email addresses and emails on a single platform through this program. Since its launch, Thunderbird has added to its arsenal many new useful tools including activity manager, an address book, and message searching among others.
Thunderbird Gmail Settings (Automatic set up)
While the procedure is going to be roughly similar for all sorts of email platforms, you’ll have to make some preceding adjustments to allow Thunderbird access to your email account. Thunderbird Gmail settings on Windows 10 are similar to other newer versions of Windows and hence, the guidelines below should be useful for most Windows users.
Gmail requires some changes to its default settings for configuring your Gmail account with Thunderbird. In addition to setting up your Gmail account, you can also set up your Google apps account (e.g. name@domain.com) this way.
Here’s how to do it:
Step 1- Sign in to your Google Apps or Gmail account.
Step 2- Access the settings to Setup the Thunderbird Email Account Manually.
Step 3- Click on the tab that says “Forwarding and POP/IMAP” to open it and then select the option that says “Enable IMAP”.PS. Make sure to save the changes you make in either of the cases.
After the aforementioned steps, the procedure would be much or less the same.
Step 4- Download and install Thunderbird on your desktop. You may visit the Mozilla Thunderbird’s official webpage to download and install it.
Step 5- After downloading and installing click on “Tools” from the menu bar.
Step 6- From the drop-down menu choose “Account Settings”.
Step 7- Thereon, from the “Account Actions” drop-down the menu near the bottom of the screen select “Add Mail Account…”
Step 8- In the designated fill-in boxes, enter your name, the email address, and your password. Click on the “Next” or “Continue” key.
Step 9- You can decide between the available storage types: POP3 and IMAP.
Step 10- By choosing IMAP you’ll be keeping your emails online. It means Thunderbird will be able to synchronize with your email platform only when you’re connected to the internet.
Thunderbird POP3 settings, on the other hand, allows you to store your emails on your computer/laptop.
Step 11- Thunderbird will most likely start configuring your settings automatically. To change that you can click on the button “stop” and then configure it yourself using “Manual Setup…” When you have a Google apps account, you may have to do it regardless since Thunderbird is at times unable to find settings for it by itself.
The aforementioned steps will help you apply the Thunderbird Gmail settings automatically and your Gmail account will be configured without any problem.
Thunderbird Gmail Settings (Manual Setup)
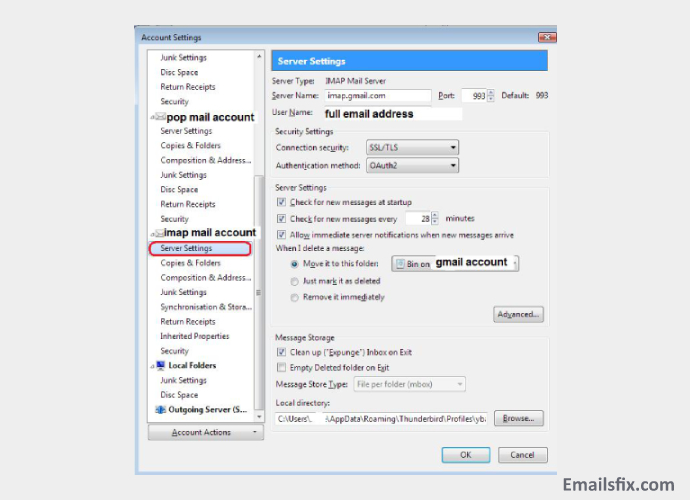
Step 1- Clicking on the “Manual Setup…” tab will open a pane for your “server settings”. This pane will help you set up your incoming mail server. In the “Server Name” field you’ll type in your email access domain (e.g. example.mail.com). As for your User Name, it would be your complete email address.
Step 2- In the Security Settings just below, you should select SSL/TSL for connection security.
3) Click on the tab that says “Forwarding and POP/IMAP” to open it and then select the option that says “Enable IMAP”.How To Thunderbird Email Account Setup Manually

Step 3- Thereafter click on “Outgoing Server (STMP)”. You’ll find it at the bottom left of the display. Select the outgoing server that Thunderbird made for the account and click on “Edit…”
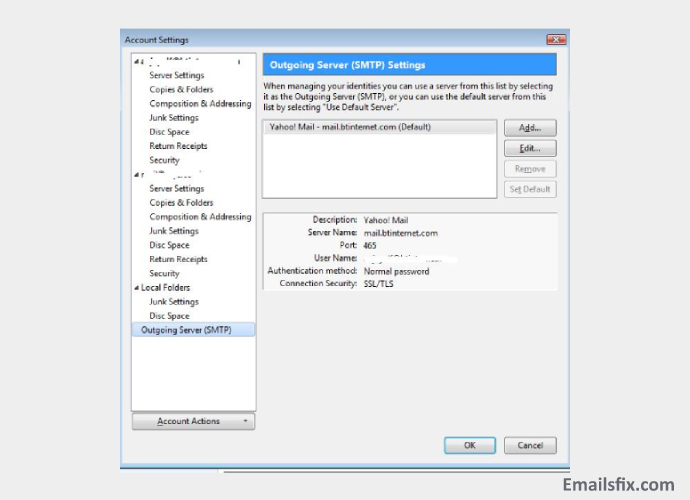
Step 4- Under “Security and Authentication” select “SSL/TLS” for “Connection security” and “Normal password” as for the “Authentication method”. Once again, your complete email address will be your username.
Step 5- In the end, click on “OK” and then “OK” once again once you’re at the main settings page. This way you’ll reach Thunderbird’s main window.
Finally, click on “Get mail” or in some cases “Read messages” so as to have Thunderbird download all your emails instantaneously.
These were the steps that you need to follow for setting up the Gmail account manually on Thunderbird.
Thunderbird Yahoo Settings
Since Yahoo’s default settings don’t allow any non-Yahoo applications to access your email you’ll have to disable this restriction. Thereafter, you’ll be able to set up your Yahoo mail on Thunderbird without any hassle. Follow the below-mentioned steps in sequence to apply the Thunderbird Yahoo settings that are required for configuring your Yahoo mail account on Thunderbird.
The Thunderbird Yahoo settings can be done in two ways, one is through the IMAP server and the other is through the POP3 server. We will tell you both the ways below.
Thunderbird Yahoo IMAP Settings
Step 1- Firstly, you need to launch Mozilla Thunderbird and then click on your email.
Step 2- Now, move towards the section of “Create a new account” and then click on Email.
Step 3- Select the “Skip this and use my existing email” option.
Step 4- You need to enter all the required details such as your name, username, and password as per your Yahoo email account and then click on the “Continue” button.
Step 5- Select the IMAP option to proceed with the account configuration as per the IMAP settings. The IMAP settings will allow you to store all your email data on the server itself instead of using the system storage.
Step 6- Now, you can either go on with the default settings or input the settings manually as per your requirement. For the manual configuration, enter the following settings:
- Input “imap.mail.yahoo.com” in the place of Incoming Mail Server (SMTP).
- Input “smtp.mail.yahoo.com” in the place of Outgoing Mail Server (SMTP).
- Set the incoming port to 993 and security type as SSL.
- Set the outgoing port to 465 and security type as SSL or set the outgoing port to 587 and security type as SSL/TLS.
Step 7- After following the aforementioned steps, make a click on the “Re-test” option to ensure that the entered settings are working fine or not. If you don’t find any problem with the settings, you can move further.
Step 8- In the end, click on the “Done” button to apply the settings and now you will be able to use your yahoo mail services on Thunderbird with ease.
After following the aforementioned steps, your Yahoo mail account will be configured on the thunderbird IMAP server. But if you wish to configure your yahoo mail account on the Thunderbird POP3 server then read below to find the steps for it.
Thunderbird Yahoo POP3 Settings
Doing your Thunderbird email account setup manually:
Follow the below-mentioned steps carefully to configure your Yahoo mail on the Thunderbird POP3 server.
Step 1- First of all, you need to log into your Yahoo mail account and then click on the Gear icon.
Step 2- Now, go to the settings and then click on the option of “Edit” that is placed next to the “Yahoo Account Settings”.
Step 3- Make sure that the POP option is set to be enabled.
Step 4- Click on the “Save” button and then you must sign out from your Yahoo mail account.
Step 5- Now you need to open the Mozilla Thunderbird on your system and then click on the Email.
Step 6- Move towards the “create a new account” section and then click on the “Email”.
Step 7- Select the option of “Skip this and use my existing email”.
Step 8- You need to input all the required details such as your name, username and the password of your Yahoo mail account and then click on the “Continue” button.
Step 9- Select POP3 if you wish to move further with the POP account setup.
Step 10- Your Yahoo mail account will be synced with the Thunderbird.
Step 11- In the end, click on the “Done” button and enjoy using all the Yahoo mail features and services on Thunderbird.
We hope that your Yahoo mail account is successfully configured on Thunderbird after following the steps mentioned above.
You can also find here the detailed guide describing the Att.net email settings, Comcast email settings and 1and1 email settings for different devices and email clients. The settings are really simple to follow and execute individually.
Still not clear about the Thunderbird Gmail settings or Thunderbird Yahoo settings? Don’t worry, you can connect with our technical team through the live chat support and get guidance regarding the same. Our technical team is ready to resolve all your Thunderbird related queries and confusions 24*7
