Cox.net Email IMAP, POP3 & SMTP Server Settings
Cox Communications is a privately owned subsidiary of Cox Enterprises. Apart from providing digital cable, Cox also provides an excellent email service for its customers. If you are a user of Cox Email service and are looking to configure a third-party client with cox email settings, then you have come to the right place. The most notable settings are for IMAP, SMTP and POP/POP3.
So without further ado, lets jump right into it. Please make a note that these Cox email server settings should be handy when you are setting up Cox on desktop or other devices. Cox.net email settings for IMAP, POP & SMTP are mentioned below for your convenience.
Cox Email IMAP Settings
Please follow the below-mentioned steps to set up Cox email IMAP Settings:-
- Log in to your Cox Email account.
- Go to settings and click on account type.
- In account type, make sure you have chosen Imap.
- In the username enter Cox email id.
- In the password box, enter your email account password.
- Server Hostname should be imap.cox.net
- 993 should be entered in the ServerPort
- In the ‘required authentication’ box enter ‘Yes.’
- Choose ‘Yes’ in the SSL/TLS
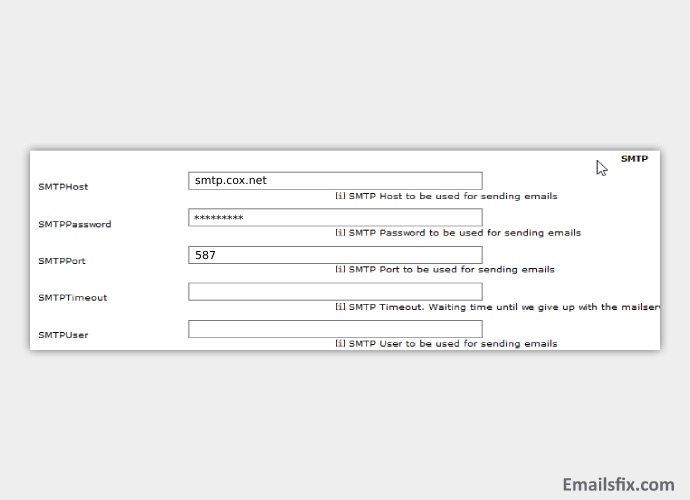
Cox Email SMTP Settings
Please follow the below-mentioned steps to set up Cox email SMTP Settings:-
- The account type should be SMTP
- For username, key in your COX Email id.
- Enter Cox Email id password in the password dialog box,
- Smtp.cox.net should be entered in the ‘server hostname.’
- In the server port number key in 587
- If you require authentication, then choose yes in the ‘Require Authentication’ Box.
- ‘Yes’ should be chosen for SSL/TLS
Cox Email POP3 Settings
There some things that you should keep in mind when setting up Cox using POP settings; here are some of them.
- There might be an issue in syncing across multiple devices.
- It is highly recommended to take a backup of your settings and emails.
To configure your Cox using POP settings follow these steps:-
- Login to your Cox account
- Go to Settings.
- In the ‘account type’ panel choose POP
- Where it is written ‘pop.cox.net,’ the incoming POP port should be 995
Now, based on the encryption type that you are using, Mention one of the following in the outgoing SMTP port Number:-
- For TLS or SSL the value of the port number should be 587
- For SSL based encryption, the port number should be 587, and the authentication box should be tick marked.
We are confident that after going through this write-up, you will face no problem when setting up your Cox email account. If you are facing any issues, then please feel free to reach out to us.