Auto-Complete Outlook 2010 – Solution

Autocomplete feature is a feature provided in Outlook, which handles both automatic name change and completion. Auto-complete Outlook 2010 features give you an extra handling tool for your conveyance. When you write an email to someone and start writing the name of the person and type the first letter of their name,
The auto-complete Outlook 2010 provides a list of names starting from that alphabet. Another feature of auto-complete Outlook 2010 that it provides you a confirmation regarding whether your email is received at the receiver’s end or not.
Outlook handles Autocomplete features in an autonomous manner by saving your data such as Simple Mail Transfer Protocol (SMTP), LegacyExchangeDN entries, Contacts, Email addresses in its Outlook directory.
New Algorithm For Auto Complete Outlook 2010
Outlook has given a new approach to its algorithm and updates the auto-complete Outlook 2010 feature in which now you are restricted to 1000 entries only for their Outlook 2003 version, Outlook 2010 version, Outlook 2013 version, Outlook 2016 version also. But there is Good news for Outlook 2007 version user as if you are using this version autocomplete features will save 2000 entries.
Recover your Contact & Emails Back Through Auto-complete Outlook 2010
Access the hidden files
- Click on computer logo on your desktop screen, but if you got it deleted somehow
- (go and click on windows logo and click on computer shown in the grey color panel)
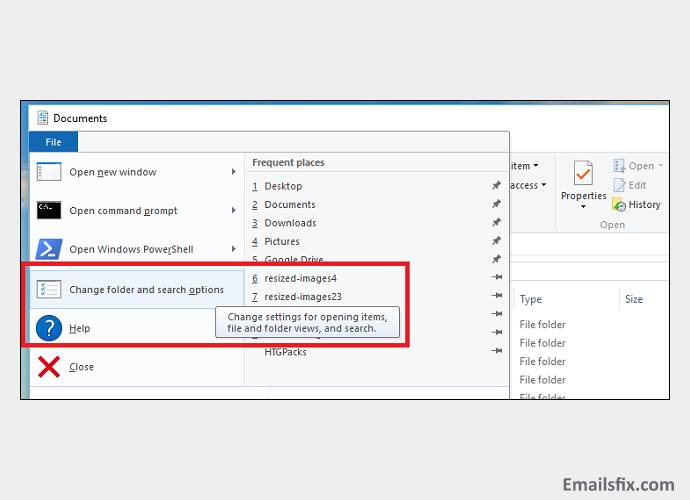
- You can see organize written on the windows panel bar, click on organize.
- When you click on to organize, a panel will open. Locate folder & search options and click on it.
- You will get a folder options window on your screen with three options ahead of you- General, View, and Search.
- Select View and locate hidden folders and files(there is folder logo prior to the text)
- Click on show folder, files, and drives.
- Now click on Apply and then ok.
Access The Autocomplete Outlook 2010 Data Directory
- Go to your Local Disk (C:) and you’ll see a folder named Users. Click on it.
- Locate and click on your name (Ex: Smith )folder if you have given a username to yourself. (if not Select and click on the username folder.)
- Click on the AppData folder then search and click on the folder named Local.
- Inside the local folder, search for Microsoft folder and click on it.
- Now search and click for the Outlook folder.
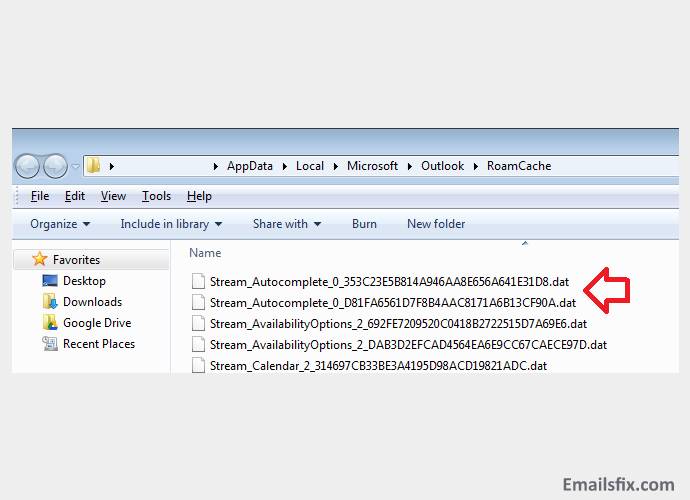
- When you open an Outlook folder, you will see the Roam cache folder.
- When you open the Roam cache folder, you’ll see a lot of files starting with the name Stream_XXXX_0_63DSXXXXXX along with size (i,e 1 KB, 9 KB)
- Select the Stream_Autocomplete _0_GSHDG983XXX file having the highest size as it will store the whole data.
- Copy the Stream_Autocomplete _0_GSHDG983XXX file into your Pen Drive or storage devices you have.
Update the Auto-Complete Outlook 2010 New Data Directory
(Same can be done for higher versions)
- Go to your Local Disk (C:) and you’ll see a folder named Users. Click on it.
- Locate and click on your name (Ex: Smith )folder if you have given a username to yourself. (if not Select and click on the username folder.)
- Click on the AppData folder then search and click on the folder named Local.
- Inside the local folder, search for Microsoft folder and click on it.
- Now search and click for the Outlook folder.
- When you open an Outlook folder, you will see the Roam cache folder.
- (Till here you have to do the same step as mentioned above in Solution Step 2. But make sure your files and folders are still in unhidden manner )
- Keep your folder window open in the background and open your new updated Outlook version.
- Compose an email on your new Outlook and sent it a mock email address
- (Ex: smithrex@sjdjsd.in). It will generate a new Stream_Autocomplete file in the same Roam Cache Directory.
- Go to the Roam Cache Directory by following the same path mentioned above. Select the new Stream_Autocomplete file and copy the name of the file. Locate your old stream_Autocomplete file and rename it with the same name as your new stream _Autocomplete file have.
Now you have to do copy and replace action, for that select your old Stream_Autocomplete file and right-click from mouse and copy the file. Go to the Roam Cache Directory by following the same path mentioned above.
Paste the old Stream_Autocomplete file. The system will generate a window regarding the copy and replace options. Click on the copy and replace it.
You can check your Outlook, it would be updated and you are good to use your contacts and email addresses again.
Do You want to Delete the Auto-Complete List in one Click?
Delete Auto-complete Outlook 2010
- Go to your Local Disk (C:) and you’ll see a folder named Users. Click on it.
- Locate and click on your name (Ex: Smith )folder if you have given a username to yourself. (if not Select and click on the username folder.)
- Click on the AppData folder then search and click on the folder named Local.
- Inside the local folder, search for Microsoft folder and click on it.
- Now search and click for the Outlook folder.
- When you open an Outlook folder, you will see the Roam cache folder.
- When you open the Roam cache folder, you’ll see a file name Stream_Autocomplete. Rename this file with a new name profilename.bak file. It will reset your data but if you want to delete it, you have to select the Stream_Autocomplete and hit the delete button from your keyboard.
Only you can set a limit on your auto-complete Outlook 2010, how?
Here is the step by step solution so that you can set the limit to yourself according to your use. It’ll help you to load your Outlook application faster if you set the limit according to your usage weighted. The following steps are:
- Click on Window logo and go for the bar search programs and files.
- Search for a file named Regedit and hit left double click on it to open.
- A window will open and asks for permission. Click on Yes.
- A new window with Registry Window will open on your desktop screen.
- There are two segregations in the window in one you see filename starting with hkey_current_user.
- Double click on the hkey_current_user file. Search for file name software and double click on it.
- You have to search for file name Office and then hit double left click on it to go to the next file. The same goes for x.0, Outlook, and Autonamecheck.
- To place the maximum value according to your version, When you finally reach the Autonamecheck file, Click on Edit and then select the New option.
- Now you have to select the DWORD Value, you have to write a text ‘’MaxNickNames ’’ and hit the Enter button from your keyboard.
- You can choose an appropriate value for the placeholder x.0 in the registry subkey according to the Outlook version you are working on. Outlook sets different placeholder values for different versions such as 16.0 For 2016 Outlook version, 15.0 for 2013 version,14.0 For 2010 Outlook version, and more.
- You have to click on Edit, a panel will open, Select Modify.
- Now you can set the limit value, always set it in the decimal format, otherwise, it will be an invalid entry. After setting the limit, Click OK to finish,
The step by step solution will surely get you the best results. But if you feel in a dilemma on where to start or how can you better understand Auto-complete Outlook 2010 features. You may be encountering more issues/errors such as Outlook 2016 Reminders Not Popping Up In Front, Outlook Reply With Attachment, etc. Here at Emailsfix, We help you with all the resources in your best interest. Feel free to contact us via chat.


