How to Add Signature in Outlook
With a signature, you can personalize your email, which can include any important contact or information that recipients can use to communicate through you. Think of it as a way to add a business card to any new message you send or respond to. You can have several signatures for various accounts, too. In this article, we'll teach you how to add signature in Outlook in Office 2016, 2013, 2010 or Office 365.
Types of details can be included in one’s email signature:
- Full name with a contact number and an alternate email address
- Website link or blog link
- Username in social media accounts like Facebook, Instagram, Skype, and Twitter
One can turn its Outlook account into really interesting and stimulating just by knowing how to change signature in Outlook and how to make change Outlook background color.
How to Create Email Signature in Outlook?
- Add a signature to Outlook 365?
- Add a signature to Outlook 2013?
- Add a signature in Outlook 2016?
- Add a signature to Outlook 2010?
- Add a signature to Outlook 2018 and 2019?
Methods to Create/Add signature in Outlook
Email signatures are the shoes of the corporate world to compose to the point mails. Personalize your email address with a formal and official-looking email and make the communication easy for your clients. Below are the methods to guide in how to create email signature in Outlook. Follow one or more of the methods as per your Microsoft Outlook version and learn to add signature in Outlook.
How to Add Signature in Outlook 365?
Microsoft Outlook 365 does not have the feature to create a native signature but, admin can align organization-wide signatures for the users with a disclaimer rule. Follow the subsequent steps to know how to add signature in office 365 Outlook email or a disclaimer that can work as an email signature in Outlook 365:
Step 1: Open Outlook 365 account
Step 2: Drop down the tab of ‘Mail flow’ and select ‘Rules’
Step 3: Click on ‘+’ to add and select ‘Apply disclaimer’
Step 4: Press on the given link of ‘Enter text’
Step 5: Choose a condition from ‘....apply this rule ..’
Step 6: Choose to append a disclaimer from ‘..Do the following..’
Step 7: Click on ‘Enter text’ and provide your signature.
The text should be written as follows:
%%YourSignature%%
Step 8: Select the option of ‘Select one’
Step 9: Click ‘Save’ to make add a disclaimer.

This is how alternatively, admins can create a user’s signature. To know How to add a signature to outlook 2013, follow the very next method.
How to add a signature in Outlook 2013?
Before you follow the steps to add a signature in Outlook 2013, you must note that creating a signature in Outlook web app cannot be used in Outlook 2013 and reciprocally. Hence, Outlook 2013 users must create a signature in each. One of the best features Outlook 2013 is it allows the users to create one default signature along with various alternative signatures. Follow the subsequent steps below to know how to create a signature in Outlook 2013:
Step 1: Go to the ‘File’ and click on ‘Options’
Step 2: Choose ‘Signatures’ from the mail section
Step 3: Click on ‘Edit signature’ and start creating your own signature
Step 4: Created signature will automatically name it as ‘default’ Click on the tab ‘Rename’ to enter your preferred name.
Step 5: Kindly select the email address to be associated with the signature.
Step 6: Select when do you want to show your signature, by dropping down ‘Menu’
Step 7: Don’t forget to click on ‘OK’ to save your signature.
These steps will help you create a signature in Outlook 2013, to know How to add a signature to outlook 2013 Web App follow the steps mentioned below:
Step 1: Navigate yourself towards ‘Settings Gear Menu’ and select the ‘Options’
Step 2: Drop down the tab of ‘Mail’ and select ‘Layout’
Step 3: Click on ‘Email signature’, create and modify your signature by using the mini toolbar
Step 4: Add your signature to all outgoing replies, forwards, and composed emails by checking with ‘Automatically include my signature on messages I send’
Step 5: Click on ‘Save’ to make changes

By following these above steps you must have learned how to add signature in Outlook, Microsoft Outlook users other than 2013, follow the next method.
How to Add Signature in Outlook 2016?
The following content with easy-to-execute steps will help you to know how to add email signature in Outlook, follow the steps below to personalize your email by adding an email signature:
Step 1: Open Outlook 2016 and navigate yourself towards ‘File’; click on ‘Options’
Step 2: Select ‘Signature’s from ‘Mail’ tab

Step 3: Click on ‘New’ and ‘Ok’ respectively, type down your name of the signature

Step 4: Add the information you want to include with your name/ email address
Step 5: Drop down the tab of ‘Replies/ forwards’ and select ‘exchange’ so that whenever you compose, reply, or forward, the signature appears automatically.
Step 6: Close and save the process by clicking on ‘OK’
These steps were for those who are using the newer version of Outlook 2016. If you are still using the older version of Outlook 2016, follow the above method to know how to add signature in Outlook 2013, or you can also look at the method of how to add signature in Outlook 2010.
How to Add Signature in Outlook 2010?
In Microsoft Outlook 2010, it changes the setting automatically appending signatures to your emails. Follow the steps to add your own signature to Outlook 2010 emails:
Step 1: After opening Outlook, Click on ‘File’ and select the ‘Options’ tab

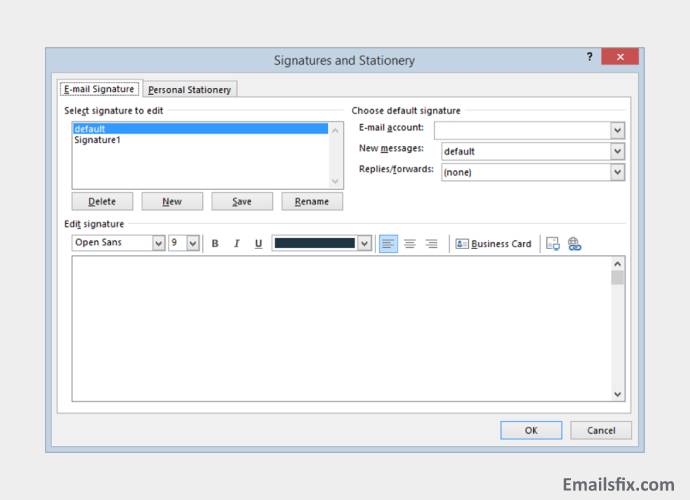
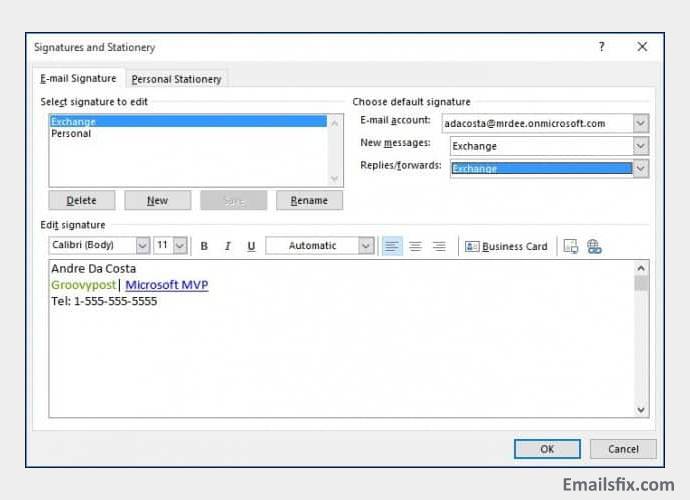
Step 2: Drop down the ‘Mail’ tab and click on ‘Signatures and Stationery’

Step 3: Select the ‘E-mail Signature’ and click on ‘New’ and ‘Ok’ respectively

Step 4: Enter your signature with what kind of information you want and assign it with your replies/ forwards/ new mails.
Step 5: Click on ‘Ok’ to apply all changes
After following the above steps, your emails will have a signature on the bottom of the content.
How to Add Signature in Outlook 2018 and 2019?
Microsoft Outlook newer versions made it easy for the users in every way. To add an email signature simply follow the steps mentioned below:
Step 1: Click on ‘File’ and select the ‘Mail’ from ‘Options’ tab

Step 2: Select ‘Signatures and Stationery’ and click on ‘New’ to add an Outlook signature

Step 3: Use formatting tools to edit your signature as per your desire
Step 4: In the ‘Choose default signature’, assign your email address with your signature and choose when do you want your signature to appear in the ‘New Messages’ and ‘Replies/forwards’

Step 5: Click on ‘Ok’ to apply changes
Note: Users can check if the signature is correctly showing by composing a new message. By any chance if the mail didn’t go with your signature, follow the steps:
Click on ‘Signature’ besides ‘Attach item’ > ‘External signature’ > assign your email address with your signature again.
Conclusion: Emailsfix experts always brings the best possible solution and methods of major-minor queries like how to add signature in all versions of Outlook like 365, 2010, 2013, 2016, 2018. If you were unable to follow the above-mentioned methods, connect with our expert technician over a chat.